Unlock the Power of Artificial Intelligence, Machine Learning, and Data Science with our Blog
Discover the latest insights, trends, and innovations in Artificial Intelligence (AI), Machine Learning (ML), and Data Science through our informative and engaging Hubspot blog. Gain a deep understanding of how these transformative technologies are shaping industries and revolutionizing the way we work.
Stay updated with cutting-edge advancements, practical applications, and real-world use.
Thursday, 8 February 2024
How to Develop a Deep Learning Photo Caption Generator from Scratch
Develop a Deep Learning Model to Automatically Describe Photographs in Python with Keras, Step-by-Step.
Caption generation is a challenging artificial intelligence problem where a textual description must be generated for a given photograph.
It requires both methods from computer vision to understand the content of the image and a language model from the field of natural language processing to turn the understanding of the image into words in the right order. Recently, deep learning methods have achieved state-of-the-art results on examples of this problem.
Deep learning methods have demonstrated state-of-the-art results on caption generation problems. What is most impressive about these methods is a single end-to-end model can be defined to predict a caption, given a photo, instead of requiring sophisticated data preparation or a pipeline of specifically designed models.
In this tutorial, you will discover how to develop a photo captioning deep learning model from scratch.
After completing this tutorial, you will know:
How to prepare photo and text data for training a deep learning model.
How to design and train a deep learning caption generation model.
How to evaluate a train caption generation model and use it to caption entirely new photographs.
We introduce a new benchmark collection for sentence-based image description and search, consisting of 8,000 images that are each paired with five different captions which provide clear descriptions of the salient entities and events.
…
The images were chosen from six different Flickr groups, and tend not to contain any well-known people or locations, but were manually selected to depict a variety of scenes and situations.
The dataset is available for free. You must complete a request form and the links to the dataset will be emailed to you. I would love to link to them for you, but the email address expressly requests: “Please do not redistribute the dataset“.
You can use the link below to request the dataset (note, this may not work any more, see below):
Within a short time, you will receive an email that contains links to two files:
Flickr8k_Dataset.zip (1 Gigabyte) An archive of all photographs.
Flickr8k_text.zip (2.2 Megabytes) An archive of all text descriptions for photographs.
UPDATE (Feb/2019): The official site seems to have been taken down (although the form still works). Here are some direct download links from my datasets GitHub repository:
Download the datasets and unzip them into your current working directory. You will have two directories:
Flickr8k_Dataset: Contains 8092 photographs in JPEG format.
Flickr8k_text: Contains a number of files containing different sources of descriptions for the photographs.
The dataset has a pre-defined training dataset (6,000 images), development dataset (1,000 images), and test dataset (1,000 images).
One measure that can be used to evaluate the skill of the model are BLEU scores. For reference, below are some ball-park BLEU scores for skillful models when evaluated on the test dataset (taken from the 2017 paper “Where to put the Image in an Image Caption Generator“):
BLEU-1: 0.401 to 0.578.
BLEU-2: 0.176 to 0.390.
BLEU-3: 0.099 to 0.260.
BLEU-4: 0.059 to 0.170.
We describe the BLEU metric more later when we work on evaluating our model.
Next, let’s look at how to load the images.
Prepare Photo Data
We will use a pre-trained model to interpret the content of the photos.
There are many models to choose from. In this case, we will use the Oxford Visual Geometry Group, or VGG, model that won the ImageNet competition in 2014. Learn more about the model here:
Keras provides this pre-trained model directly. Note, the first time you use this model, Keras will download the model weights from the Internet, which are about 500 Megabytes. This may take a few minutes depending on your internet connection.
We could use this model as part of a broader image caption model. The problem is, it is a large model and running each photo through the network every time we want to test a new language model configuration (downstream) is redundant.
Instead, we can pre-compute the “photo features” using the pre-trained model and save them to file. We can then load these features later and feed them into our model as the interpretation of a given photo in the dataset. It is no different to running the photo through the full VGG model; it is just we will have done it once in advance.
This is an optimization that will make training our models faster and consume less memory.
We can load the VGG model in Keras using the VGG class. We will remove the last layer from the loaded model, as this is the model used to predict a classification for a photo. We are not interested in classifying images, but we are interested in the internal representation of the photo right before a classification is made. These are the “features” that the model has extracted from the photo.
Keras also provides tools for reshaping the loaded photo into the preferred size for the model (e.g. 3 channel 224 x 224 pixel image).
Below is a function named extract_features() that, given a directory name, will load each photo, prepare it for VGG, and collect the predicted features from the VGG model. The image features are a 1-dimensional 4,096 element vector.
The function returns a dictionary of image identifier to image features.
1
2
3
4
5
6
7
8
9
10
11
12
13
14
15
16
17
18
19
20
21
22
23
24
25
26
27
28
# extract features from each photo in the directory
First, we will load the file containing all of the descriptions.
1
2
3
4
5
6
7
8
9
10
11
12
13
# load doc into memory
def load_doc(filename):
# open the file as read only
file=open(filename,'r')
# read all text
text=file.read()
# close the file
file.close()
returntext
filename='Flickr8k_text/Flickr8k.token.txt'
# load descriptions
doc=load_doc(filename)
Each photo has a unique identifier. This identifier is used on the photo filename and in the text file of descriptions.
Next, we will step through the list of photo descriptions. Below defines a function load_descriptions() that, given the loaded document text, will return a dictionary of photo identifiers to descriptions. Each photo identifier maps to a list of one or more textual descriptions.
1
2
3
4
5
6
7
8
9
10
11
12
13
14
15
16
17
18
19
20
21
22
23
24
25
# extract descriptions for images
def load_descriptions(doc):
mapping=dict()
# process lines
forline indoc.split('\n'):
# split line by white space
tokens=line.split()
iflen(line)<2:
continue
# take the first token as the image id, the rest as the description
image_id,image_desc=tokens[0],tokens[1:]
# remove filename from image id
image_id=image_id.split('.')[0]
# convert description tokens back to string
image_desc=' '.join(image_desc)
# create the list if needed
ifimage_id notinmapping:
mapping[image_id]=list()
# store description
mapping[image_id].append(image_desc)
returnmapping
# parse descriptions
descriptions=load_descriptions(doc)
print('Loaded: %d '%len(descriptions))
Next, we need to clean the description text. The descriptions are already tokenized and easy to work with.
We will clean the text in the following ways in order to reduce the size of the vocabulary of words we will need to work with:
Convert all words to lowercase.
Remove all punctuation.
Remove all words that are one character or less in length (e.g. ‘a’).
Remove all words with numbers in them.
Below defines the clean_descriptions() function that, given the dictionary of image identifiers to descriptions, steps through each description and cleans the text.
1
2
3
4
5
6
7
8
9
10
11
12
13
14
15
16
17
18
19
20
21
22
23
import string
def clean_descriptions(descriptions):
# prepare translation table for removing punctuation
table=str.maketrans('','',string.punctuation)
forkey,desc_list indescriptions.items():
foriinrange(len(desc_list)):
desc=desc_list[i]
# tokenize
desc=desc.split()
# convert to lower case
desc=[word.lower()forwordindesc]
# remove punctuation from each token
desc=[w.translate(table)forwindesc]
# remove hanging 's' and 'a'
desc=[wordforwordindesc iflen(word)>1]
# remove tokens with numbers in them
desc=[wordforwordindesc ifword.isalpha()]
# store as string
desc_list[i]=' '.join(desc)
# clean descriptions
clean_descriptions(descriptions)
Once cleaned, we can summarize the size of the vocabulary.
Ideally, we want a vocabulary that is both expressive and as small as possible. A smaller vocabulary will result in a smaller model that will train faster.
For reference, we can transform the clean descriptions into a set and print its size to get an idea of the size of our dataset vocabulary.
1
2
3
4
5
6
7
8
9
10
11
# convert the loaded descriptions into a vocabulary of words
Finally, we can save the dictionary of image identifiers and descriptions to a new file named descriptions.txt, with one image identifier and description per line.
Below defines the save_descriptions() function that, given a dictionary containing the mapping of identifiers to descriptions and a filename, saves the mapping to file.
Running the example first prints the number of loaded photo descriptions (8,092) and the size of the clean vocabulary (8,763 words).
1
2
Loaded: 8,092
Vocabulary Size: 8,763
Finally, the clean descriptions are written to ‘descriptions.txt‘.
Taking a look at the file, we can see that the descriptions are ready for modeling. The order of descriptions in your file may vary.
1
2
3
4
5
6
2252123185_487f21e336 bunch on people are seated in stadium
2252123185_487f21e336 crowded stadium is full of people watching an event
2252123185_487f21e336 crowd of people fill up packed stadium
2252123185_487f21e336 crowd sitting in an indoor stadium
2252123185_487f21e336 stadium full of people watch game
...
Develop Deep Learning Model
In this section, we will define the deep learning model and fit it on the training dataset.
This section is divided into the following parts:
Loading Data.
Defining the Model.
Fitting the Model.
Complete Example.
Loading Data
First, we must load the prepared photo and text data so that we can use it to fit the model.
We are going to train the data on all of the photos and captions in the training dataset. While training, we are going to monitor the performance of the model on the development dataset and use that performance to decide when to save models to file.
The train and development dataset have been predefined in the Flickr_8k.trainImages.txt and Flickr_8k.devImages.txt files respectively, that both contain lists of photo file names. From these file names, we can extract the photo identifiers and use these identifiers to filter photos and descriptions for each set.
The function load_set() below will load a pre-defined set of identifiers given the train or development sets filename.
1
2
3
4
5
6
7
8
9
10
11
12
13
14
15
16
17
18
19
20
21
22
23
# load doc into memory
def load_doc(filename):
# open the file as read only
file=open(filename,'r')
# read all text
text=file.read()
# close the file
file.close()
returntext
# load a pre-defined list of photo identifiers
def load_set(filename):
doc=load_doc(filename)
dataset=list()
# process line by line
forline indoc.split('\n'):
# skip empty lines
iflen(line)<1:
continue
# get the image identifier
identifier=line.split('.')[0]
dataset.append(identifier)
returnset(dataset)
Now, we can load the photos and descriptions using the pre-defined set of train or development identifiers.
Below is the function load_clean_descriptions() that loads the cleaned text descriptions from ‘descriptions.txt‘ for a given set of identifiers and returns a dictionary of identifiers to lists of text descriptions.
The model we will develop will generate a caption given a photo, and the caption will be generated one word at a time. The sequence of previously generated words will be provided as input. Therefore, we will need a ‘first word’ to kick-off the generation process and a ‘last word‘ to signal the end of the caption.
We will use the strings ‘startseq‘ and ‘endseq‘ for this purpose. These tokens are added to the loaded descriptions as they are loaded. It is important to do this now before we encode the text so that the tokens are also encoded correctly.
1
2
3
4
5
6
7
8
9
10
11
12
13
14
15
16
17
18
19
20
# load clean descriptions into memory
def load_clean_descriptions(filename,dataset):
# load document
doc=load_doc(filename)
descriptions=dict()
forline indoc.split('\n'):
# split line by white space
tokens=line.split()
# split id from description
image_id,image_desc=tokens[0],tokens[1:]
# skip images not in the set
ifimage_id indataset:
# create list
ifimage_id notindescriptions:
descriptions[image_id]=list()
# wrap description in tokens
desc='startseq '+' '.join(image_desc)+' endseq'
# store
descriptions[image_id].append(desc)
returndescriptions
Next, we can load the photo features for a given dataset.
Below defines a function named load_photo_features() that loads the entire set of photo descriptions, then returns the subset of interest for a given set of photo identifiers.
This is not very efficient; nevertheless, this will get us up and running quickly.
1
2
3
4
5
6
7
# load photo features
def load_photo_features(filename,dataset):
# load all features
all_features=load(open(filename,'rb'))
# filter features
features={k:all_features[k]forkindataset}
returnfeatures
We can pause here and test everything developed so far.
Running this example first loads the 6,000 photo identifiers in the training dataset. These features are then used to filter and load the cleaned description text and the pre-computed photo features.
We are nearly there.
1
2
3
Dataset: 6,000
Descriptions: train=6,000
Photos: train=6,000
The description text will need to be encoded to numbers before it can be presented to the model as in input or compared to the model’s predictions.
The first step in encoding the data is to create a consistent mapping from words to unique integer values. Keras provides the Tokenizer class that can learn this mapping from the loaded description data.
Below defines the to_lines() to convert the dictionary of descriptions into a list of strings and the create_tokenizer() function that will fit a Tokenizer given the loaded photo description text.
1
2
3
4
5
6
7
8
9
10
11
12
13
14
15
16
17
18
# convert a dictionary of clean descriptions to a list of descriptions
def to_lines(descriptions):
all_desc=list()
forkey indescriptions.keys():
[all_desc.append(d)fordindescriptions[key]]
returnall_desc
# fit a tokenizer given caption descriptions
def create_tokenizer(descriptions):
lines=to_lines(descriptions)
tokenizer=Tokenizer()
tokenizer.fit_on_texts(lines)
returntokenizer
# prepare tokenizer
tokenizer=create_tokenizer(train_descriptions)
vocab_size=len(tokenizer.word_index)+1
print('Vocabulary Size: %d'%vocab_size)
We can now encode the text.
Each description will be split into words. The model will be provided one word and the photo and generate the next word. Then the first two words of the description will be provided to the model as input with the image to generate the next word. This is how the model will be trained.
For example, the input sequence “little girl running in field” would be split into 6 input-output pairs to train the model:
1
2
3
4
5
6
7
X1, X2 (text sequence), y (word)
photo startseq, little
photo startseq, little, girl
photo startseq, little, girl, running
photo startseq, little, girl, running, in
photo startseq, little, girl, running, in, field
photo startseq, little, girl, running, in, field, endseq
Later, when the model is used to generate descriptions, the generated words will be concatenated and recursively provided as input to generate a caption for an image.
The function below named create_sequences(), given the tokenizer, a maximum sequence length, and the dictionary of all descriptions and photos, will transform the data into input-output pairs of data for training the model. There are two input arrays to the model: one for photo features and one for the encoded text. There is one output for the model which is the encoded next word in the text sequence.
The input text is encoded as integers, which will be fed to a word embedding layer. The photo features will be fed directly to another part of the model. The model will output a prediction, which will be a probability distribution over all words in the vocabulary.
The output data will therefore be a one-hot encoded version of each word, representing an idealized probability distribution with 0 values at all word positions except the actual word position, which has a value of 1.
1
2
3
4
5
6
7
8
9
10
11
12
13
14
15
16
17
18
19
20
21
22
# create sequences of images, input sequences and output words for an image
We will need to calculate the maximum number of words in the longest description. A short helper function named max_length() is defined below.
1
2
3
4
# calculate the length of the description with the most words
def max_length(descriptions):
lines=to_lines(descriptions)
returnmax(len(d.split())fordinlines)
We now have enough to load the data for the training and development datasets and transform the loaded data into input-output pairs for fitting a deep learning model.
Defining the Model
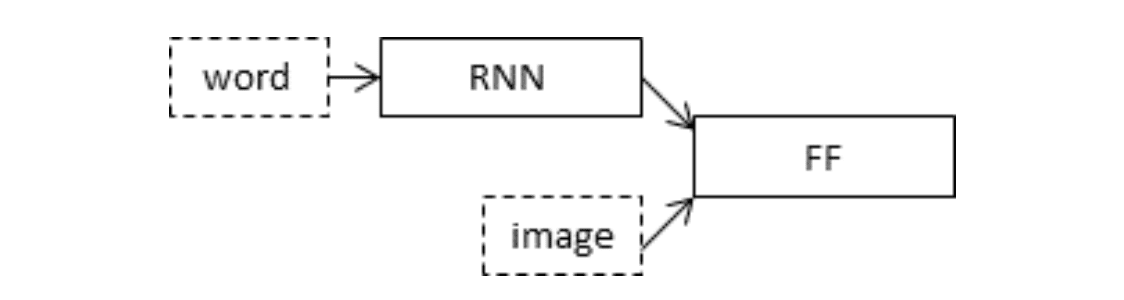
We will define a deep learning based on the “merge-model” described by Marc Tanti, et al. in their 2017 papers:
The authors provide a nice schematic of the model, reproduced below.
Schematic of the Merge Model For Image Captioning
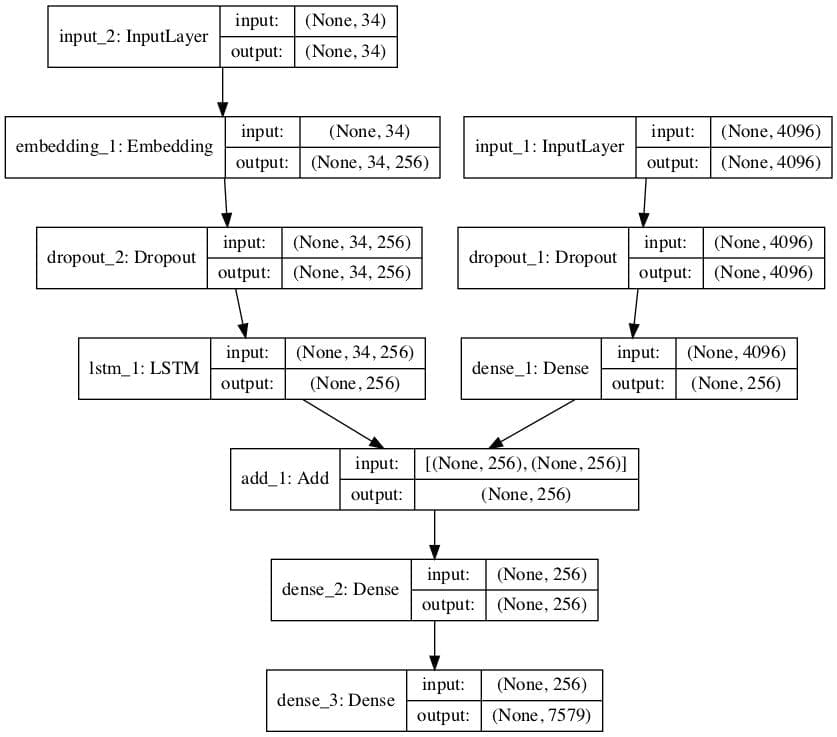
We will describe the model in three parts:
Photo Feature Extractor. This is a 16-layer VGG model pre-trained on the ImageNet dataset. We have pre-processed the photos with the VGG model (without the output layer) and will use the extracted features predicted by this model as input.
Sequence Processor. This is a word embedding layer for handling the text input, followed by a Long Short-Term Memory (LSTM) recurrent neural network layer.
Decoder (for lack of a better name). Both the feature extractor and sequence processor output a fixed-length vector. These are merged together and processed by a Dense layer to make a final prediction.
The Photo Feature Extractor model expects input photo features to be a vector of 4,096 elements. These are processed by a Dense layer to produce a 256 element representation of the photo.
The Sequence Processor model expects input sequences with a pre-defined length (34 words) which are fed into an Embedding layer that uses a mask to ignore padded values. This is followed by an LSTM layer with 256 memory units.
Both the input models produce a 256 element vector. Further, both input models use regularization in the form of 50% dropout. This is to reduce overfitting the training dataset, as this model configuration learns very fast.
The Decoder model merges the vectors from both input models using an addition operation. This is then fed to a Dense 256 neuron layer and then to a final output Dense layer that makes a softmax prediction over the entire output vocabulary for the next word in the sequence.
The function below named define_model() defines and returns the model ready to be fit.
We also create a plot to visualize the structure of the network that better helps understand the two streams of input.
Plot of the Caption Generation Deep Learning Model
Fitting the Model
Now that we know how to define the model, we can fit it on the training dataset.
The model learns fast and quickly overfits the training dataset. For this reason, we will monitor the skill of the trained model on the holdout development dataset. When the skill of the model on the development dataset improves at the end of an epoch, we will save the whole model to file.
At the end of the run, we can then use the saved model with the best skill on the training dataset as our final model.
We can do this by defining a ModelCheckpoint in Keras and specifying it to monitor the minimum loss on the validation dataset and save the model to a file that has both the training and validation loss in the filename.
We can then specify the checkpoint in the call to fit() via the callbacks argument. We must also specify the development dataset in fit() via the validation_data argument.
We will only fit the model for 20 epochs, but given the amount of training data, each epoch may take 30 minutes on modern hardware.
Running the example first prints a summary of the loaded training and development datasets.
1
2
3
4
5
6
7
8
Dataset: 6,000
Descriptions: train=6,000
Photos: train=6,000
Vocabulary Size: 7,579
Description Length: 34
Dataset: 1,000
Descriptions: test=1,000
Photos: test=1,000
After the summary of the model, we can get an idea of the total number of training and validation (development) input-output pairs.
1
Train on 306,404 samples, validate on 50,903 samples
The model then runs, saving the best model to .h5 files along the way.
On my run, the best validation results were saved to the file:
model-ep002-loss3.245-val_loss3.612.h5
This model was saved at the end of epoch 2 with a loss of 3.245 on the training dataset and a loss of 3.612 on the development dataset
Note: Your results may vary given the stochastic nature of the algorithm or evaluation procedure, or differences in numerical precision. Consider running the example a few times and compare the average outcome.
Let me know what you get in the comments below.
If you ran the example on AWS, copy the model file back to your current working directory. If you need help with commands on AWS, see the post:
Note: If you had no problems in the previous section, please skip this section. This section is for those who do not have enough memory to train the model as described in the previous section (e.g. cannot use AWS EC2 for whatever reason).
The training of the caption model does assume you have a lot of RAM.
The code in the previous section is not memory efficient and assumes you are running on a large EC2 instance with 32GB or 64GB of RAM. If you are running the code on a workstation of 8GB of RAM, you cannot train the model.
A workaround is to use progressive loading. This was discussed in detail in the second-last section titled “Progressive Loading” in the post:
I recommend reading that section before continuing.
If you want to use progressive loading, to train this model, this section will show you how.
The first step is we must define a function that we can use as the data generator.
We will keep things very simple and have the data generator yield one photo’s worth of data per batch. This will be all of the sequences generated for a photo and its set of descriptions.
The function below data_generator() will be the data generator and will take the loaded textual descriptions, photo features, tokenizer and max length. Here, I assume that you can fit this training data in memory, which I believe 8GB of RAM should be more than capable.
How does this work? Read the post I just mentioned above that introduces data generators.
1
2
3
4
5
6
7
8
9
# data generator, intended to be used in a call to model.fit_generator()
You can see that we are calling the create_sequence() function to create a batch worth of data for a single photo rather than an entire dataset. This means that we must update the create_sequences() function to delete the “iterate over all descriptions” for-loop.
The updated function is as follows:
1
2
3
4
5
6
7
8
9
10
11
12
13
14
15
16
17
18
19
20
# create sequences of images, input sequences and output words for an image
Note, this is a very basic data generator. The big memory saving it offers is to not have the unrolled sequences of train and test data in memory prior to fitting the model, that these samples (e.g. results from create_sequences()) are created as needed per photo.
Some off-the-cuff ideas for further improving this data generator include:
Randomize the order of photos each epoch.
Work with a list of photo ids and load text and photo data as needed to cut even further back on memory.
Yield more than one photo’s worth of samples per batch.
I have experienced with these variations myself in the past. Let me know if you do and how you go in the comments.
You can sanity check a data generator by calling it directly, as follows:
Running this sanity check will show what one batch worth of sequences looks like, in this case 47 samples to train on for the first photo.
1
2
3
(47, 4096)
(47, 34)
(47, 7579)
Finally, we can use the fit_generator() function on the model to train the model with this data generator.
In this simple example we will discard the loading of the development dataset and model checkpointing and simply save the model after each training epoch. You can then go back and load/evaluate each saved model after training to find the one we the lowest loss that you can then use in the next section.
The code to train the model with the data generator is as follows:
1
2
3
4
5
6
7
8
9
10
# train the model, run epochs manually and save after each epoch
Perhaps evaluate each saved model and choose the one final model with the lowest loss on a holdout dataset. The next section may help with this.
Did you use this new addition to the tutorial? How did you go?
Evaluate Model
Once the model is fit, we can evaluate the skill of its predictions on the holdout test dataset.
We will evaluate a model by generating descriptions for all photos in the test dataset and evaluating those predictions with a standard cost function.
First, we need to be able to generate a description for a photo using a trained model.
This involves passing in the start description token ‘startseq‘, generating one word, then calling the model recursively with generated words as input until the end of sequence token is reached ‘endseq‘ or the maximum description length is reached.
The function below named generate_desc() implements this behavior and generates a textual description given a trained model, and a given prepared photo as input. It calls the function word_for_id() in order to map an integer prediction back to a word.
We will generate predictions for all photos in the test dataset and in the train dataset.
The function below named evaluate_model() will evaluate a trained model against a given dataset of photo descriptions and photo features. The actual and predicted descriptions are collected and evaluated collectively using the corpus BLEU score that summarizes how close the generated text is to the expected text.
BLEU scores are used in text translation for evaluating translated text against one or more reference translations.
Here, we compare each generated description against all of the reference descriptions for the photograph. We then calculate BLEU scores for 1, 2, 3 and 4 cumulative n-grams.
We can put all of this together with the functions from the previous section for loading the data. We first need to load the training dataset in order to prepare a Tokenizer so that we can encode generated words as input sequences for the model. It is critical that we encode the generated words using exactly the same encoding scheme as was used when training the model.
We then use these functions for loading the test dataset.
The complete example is listed below.
1
2
3
4
5
6
7
8
9
10
11
12
13
14
15
16
17
18
19
20
21
22
23
24
25
26
27
28
29
30
31
32
33
34
35
36
37
38
39
40
41
42
43
44
45
46
47
48
49
50
51
52
53
54
55
56
57
58
59
60
61
62
63
64
65
66
67
68
69
70
71
72
73
74
75
76
77
78
79
80
81
82
83
84
85
86
87
88
89
90
91
92
93
94
95
96
97
98
99
100
101
102
103
104
105
106
107
108
109
110
111
112
113
114
115
116
117
118
119
120
121
122
123
124
125
126
127
128
129
130
131
132
133
134
135
136
137
138
139
140
141
142
143
144
145
146
147
148
149
150
151
152
153
154
155
156
157
158
159
160
161
162
163
164
from numpy import argmax
from pickle import load
from keras.preprocessing.text import Tokenizer
from keras.preprocessing.sequence import pad_sequences
from keras.models import load_model
from nltk.translate.bleu_score import corpus_bleu
# load doc into memory
def load_doc(filename):
# open the file as read only
file=open(filename,'r')
# read all text
text=file.read()
# close the file
file.close()
returntext
# load a pre-defined list of photo identifiers
def load_set(filename):
doc=load_doc(filename)
dataset=list()
# process line by line
forline indoc.split('\n'):
# skip empty lines
iflen(line)<1:
continue
# get the image identifier
identifier=line.split('.')[0]
dataset.append(identifier)
returnset(dataset)
# load clean descriptions into memory
def load_clean_descriptions(filename,dataset):
# load document
doc=load_doc(filename)
descriptions=dict()
forline indoc.split('\n'):
# split line by white space
tokens=line.split()
# split id from description
image_id,image_desc=tokens[0],tokens[1:]
# skip images not in the set
ifimage_id indataset:
# create list
ifimage_id notindescriptions:
descriptions[image_id]=list()
# wrap description in tokens
desc='startseq '+' '.join(image_desc)+' endseq'
# store
descriptions[image_id].append(desc)
returndescriptions
# load photo features
def load_photo_features(filename,dataset):
# load all features
all_features=load(open(filename,'rb'))
# filter features
features={k:all_features[k]forkindataset}
returnfeatures
# covert a dictionary of clean descriptions to a list of descriptions
def to_lines(descriptions):
all_desc=list()
forkey indescriptions.keys():
[all_desc.append(d)fordindescriptions[key]]
returnall_desc
# fit a tokenizer given caption descriptions
def create_tokenizer(descriptions):
lines=to_lines(descriptions)
tokenizer=Tokenizer()
tokenizer.fit_on_texts(lines)
returntokenizer
# calculate the length of the description with the most words
Note: Your results may vary given the stochastic nature of the algorithm or evaluation procedure, or differences in numerical precision. Consider running the example a few times and compare the average outcome.
We can see that the scores fit within and close to the top of the expected range of a skillful model on the problem. The chosen model configuration is by no means optimized.
1
2
3
4
BLEU-1: 0.579114
BLEU-2: 0.344856
BLEU-3: 0.252154
BLEU-4: 0.131446
Generate New Captions
Now that we know how to develop and evaluate a caption generation model, how can we use it?
Almost everything we need to generate captions for entirely new photographs is in the model file.
We also need the Tokenizer for encoding generated words for the model while generating a sequence, and the maximum length of input sequences, used when we defined the model (e.g. 34).
We can hard code the maximum sequence length. With the encoding of text, we can create the tokenizer and save it to a file so that we can load it quickly whenever we need it without needing the entire Flickr8K dataset. An alternative would be to use our own vocabulary file and mapping to integers function during training.
We can create the Tokenizer as before and save it as a pickle file tokenizer.pkl. The complete example is listed below.
1
2
3
4
5
6
7
8
9
10
11
12
13
14
15
16
17
18
19
20
21
22
23
24
25
26
27
28
29
30
31
32
33
34
35
36
37
38
39
40
41
42
43
44
45
46
47
48
49
50
51
52
53
54
55
56
57
58
59
60
61
62
63
64
65
66
67
68
69
70
71
72
73
from keras.preprocessing.text import Tokenizer
from pickle import dump
# load doc into memory
def load_doc(filename):
# open the file as read only
file=open(filename,'r')
# read all text
text=file.read()
# close the file
file.close()
returntext
# load a pre-defined list of photo identifiers
def load_set(filename):
doc=load_doc(filename)
dataset=list()
# process line by line
forline indoc.split('\n'):
# skip empty lines
iflen(line)<1:
continue
# get the image identifier
identifier=line.split('.')[0]
dataset.append(identifier)
returnset(dataset)
# load clean descriptions into memory
def load_clean_descriptions(filename,dataset):
# load document
doc=load_doc(filename)
descriptions=dict()
forline indoc.split('\n'):
# split line by white space
tokens=line.split()
# split id from description
image_id,image_desc=tokens[0],tokens[1:]
# skip images not in the set
ifimage_id indataset:
# create list
ifimage_id notindescriptions:
descriptions[image_id]=list()
# wrap description in tokens
desc='startseq '+' '.join(image_desc)+' endseq'
# store
descriptions[image_id].append(desc)
returndescriptions
# covert a dictionary of clean descriptions to a list of descriptions
Next, we must load the photo we which to describe and extract the features.
We could do this by re-defining the model and adding the VGG-16 model to it, or we can use the VGG model to predict the features and use them as inputs to our existing model. We will do the latter and use a modified version of the extract_features() function used during data preparation, but adapted to work on a single photo.
1
2
3
4
5
6
7
8
9
10
11
12
13
14
15
16
17
18
19
20
# extract features from each photo in the directory
Note: Your results may vary given the stochastic nature of the algorithm or evaluation procedure, or differences in numerical precision. Consider running the example a few times and compare the average outcome.
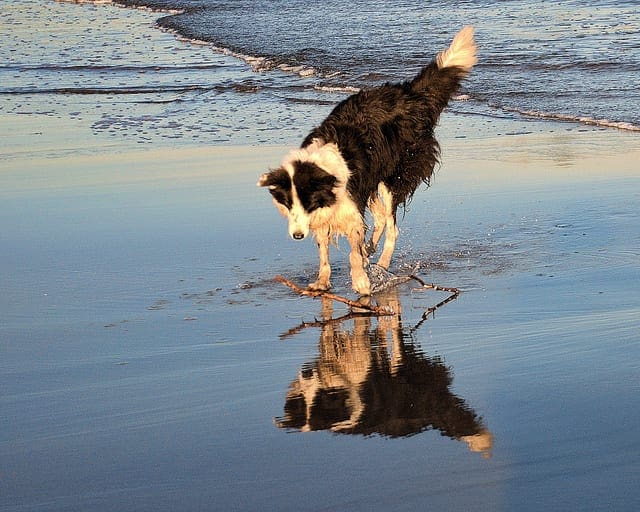
In this case, the description generated was as follows:
1
startseq dog is running across the beach endseq
You could remove the start and end tokens and you would have the basis for a nice automatic photo captioning model.
It’s like living in the future guys!
It still completely blows my mind that we can do this. Wow.
Extensions
This section lists some ideas for extending the tutorial that you may wish to explore.
Alternate Pre-Trained Photo Models. A small 16-layer VGG model was used for feature extraction. Consider exploring larger models that offer better performance on the ImageNet dataset, such as Inception.
Smaller Vocabulary. A larger vocabulary of nearly eight thousand words was used in the development of the model. Many of the words supported may be misspellings or only used once in the entire dataset. Refine the vocabulary and reduce the size, perhaps by half.
Pre-trained Word Vectors. The model learned the word vectors as part of fitting the model. Better performance may be achieved by using word vectors either pre-trained on the training dataset or trained on a much larger corpus of text, such as news articles or Wikipedia.
Tune Model. The configuration of the model was not tuned on the problem. Explore alternate configurations and see if you can achieve better performance.
Did you try any of these extensions? Share your results in the comments below.
Further Reading
This section provides more resources on the topic if you are looking go deeper.






No comments:
Post a Comment